OpenStack
Mantl uses Terraform to provision hosts in OpenStack. You can download Terraform from terraform.io.
This project provides a number of playbooks designed for doing host maintenance tasks on OpenStack hosts. You can find them in playbooks/ in the main project directory.
Configuring OpenStack authentication
Before we can build any servers using Terraform and Ansible, we need to configure authentication. We’ll be filling in the authentication variables for the template located at terraform/openstack-modules.sample.tf. It looks like this:
variable subnet_cidr { default = "10.0.0.0/24" }
variable public_key { default = "/home/you/.ssh/id_rsa.pub" }
variable ssh_user { default = "cloud-user" }

variable name { default = "mantl" }        # resources will start with "mantl-"
variable control_count { default = "3"}    # mesos masters, zk leaders, consul servers
variable worker_count { default = "5"}     # worker nodes
variable kubeworker_count { default = "2"} # kubeworker nodes
variable edge_count { default = "2"}       # load balancer nodes

# Run 'nova network-list' to get these names and values
# Floating ips are optional
variable external_network_uuid { default = "uuid-of-your-external-network" }
variable floating_ip_pool { default = "name-of-your-floating-ip-pool" }

# Run 'nova image-list' to get your image name
variable image_name  { default = "your-CentOS-7" }

# DNS servers passed to Openstack subnet
variable dns_nameservers { default = "" } # comma separated list of ips, e.g. "8.8.8.8,8.8.4.4"

#  Openstack flavors control the size of the instance, i.e. m1.xlarge.
#  Run 'nova flavor-list' to list the flavors in your environment
#  Below are typical settings for mantl
variable control_flavor_name { default = "your-XLarge" }
variable worker_flavor_name { default = "your-Large" }
variable kubeworker_flavor_name { default = "your-Large" }
variable edge_flavor_name { default = "your-Small" }

# Size of the volumes
variable control_volume_size { default = "50" }
variable worker_volume_size { default = "100" }
variable edge_volume_size { default = "20" }

module "ssh-key" {
  source = "./terraform/openstack/keypair_v2"
  public_key = "${var.public_key}"
  keypair_name = "mantl-key"
}

#Create a network with an externally attached router
module "network" {
  source = "./terraform/openstack/network"
  external_net_uuid = "${var.external_network_uuid}"
  subnet_cidr = "${var.subnet_cidr}"
  name = "${var.name}"
  dns_nameservers = "${var.dns_nameservers}"
}

# Create floating IPs for each of the roles
# These are not required if your network is exposed to the internet
# or you don't want floating ips for the instances.
module "floating-ips-control" {
  source = "./terraform/openstack/floating-ip"
  count = "${var.control_count}"
  floating_pool = "${var.floating_ip_pool}"
}

module "floating-ips-worker" {
  source = "./terraform/openstack/floating-ip"
  count = "${var.worker_count}"
  floating_pool = "${var.floating_ip_pool}"
}

module "floating-ips-kubeworker" {
  source = "./terraform/openstack/floating-ip"
  count = "${var.kubeworker_count}"
  floating_pool = "${var.floating_ip_pool}"
}

module "floating-ips-edge" {
  source = "./terraform/openstack/floating-ip"
  count = "${var.edge_count}"
  floating_pool = "${var.floating_ip_pool}"
}

# Create instances for each of the roles
module "instances-control" {
  source = "./terraform/openstack/instance"
  name = "${var.name}"
  count = "${var.control_count}"
  role = "control"
  volume_size = "${var.control_volume_size}"
  network_uuid = "${module.network.network_uuid}"
  floating_ips = "${module.floating-ips-control.ip_list}"
  keypair_name = "${module.ssh-key.keypair_name}"
  flavor_name = "${var.control_flavor_name}"
  image_name = "${var.image_name}"
  ssh_user = "${var.ssh_user}"
}

module "instances-worker" {
  source = "./terraform/openstack/instance"
  name = "${var.name}"
  count = "${var.worker_count}"
  volume_size = "${var.worker_volume_size}"
  count_format = "%03d"
  role = "worker"
  network_uuid = "${module.network.network_uuid}"
  floating_ips = "${module.floating-ips-worker.ip_list}"
  keypair_name = "${module.ssh-key.keypair_name}"
  flavor_name = "${var.worker_flavor_name}"
  image_name = "${var.image_name}"
  ssh_user = "${var.ssh_user}"
}

module "instances-kubeworker" {
  source = "./terraform/openstack/instance"
  name = "${var.name}"
  count = "${var.kubeworker_count}"
  volume_size = "100"
  count_format = "%03d"
  role = "kubeworker"
  network_uuid = "${module.network.network_uuid}"
  floating_ips = "${module.floating-ips-kubeworker.ip_list}"
  keypair_name = "${module.ssh-key.keypair_name}"
  flavor_name = "${var.kubeworker_flavor_name}"
  image_name = "${var.image_name}"
  ssh_user = "${var.ssh_user}"
}

module "instances-edge" {
  source = "./terraform/openstack/instance"
  name = "${var.name}"
  count = "${var.edge_count}"
  volume_size = "${var.edge_volume_size}"
  count_format = "%02d"
  role = "edge"
  network_uuid = "${module.network.network_uuid}"
  floating_ips = "${module.floating-ips-edge.ip_list}"
  keypair_name = "${module.ssh-key.keypair_name}"
  flavor_name = "${var.edge_flavor_name}"
  image_name = "${var.image_name}"
  ssh_user = "${var.ssh_user}"
}
Copy that file in it’s entirety to the root of the project to start customization. NOTE: All configuration entries needs to be completed. In the next sections, we’ll explain how to obtain these settings.
You can also use this file as a base for further customization. For example, you can change the names of the modules to be specific to your environment. While we will explore the authentication variables in the next sections, you will need to provide the region, flavor_name, and other such variables yourself. You can get these variables from the OpenStack command line tools. For example:
- glance image-list for image_name
- keystone tenant-list for tenant_id and tenant_name
- nova flavor-list for control_flavor_name and worker_flavor_name
Or use the appropriate OpenStack commands such as openstack project list or the commands below.
- openstack image list for image_name
- openstack network list for net_id
- openstack flavor list for control_flavor_name / worker_flavor_name
Generate SSH keys
If you do not have ssh keys already, generate a new pair for use with the project. You need to add the path to this key (public_key) to the openstack.tf file.
ssh-keygen -t rsa -f /path/to/project/sshkey -C "sshkey"
Getting OpenStack tenant settings
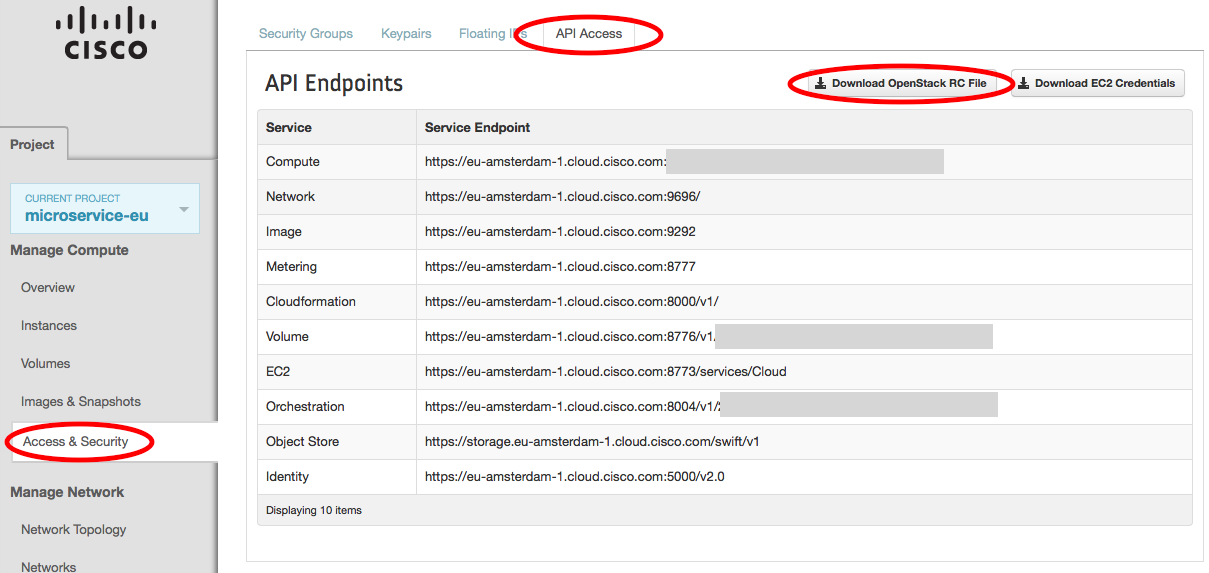
auth_url, tenant_name, and tenant_id are unique for each OpenStack datacenter. You can get these from the OpenStack web console:
- Log Into the OpenStack web console and in the Manage Compute section, select “Access & Security”.
- Select the “API Access” tab.
- Click on the “Download the OpenStack RC File” button. We’ll use this file to set up authentication.
- Download the RC file for each Data Center you want to provision servers in. You may have to log into different OpenStack web consoles.
Open the file that you just downloaded. We are interested in three of the environment variables that are exported:
export OS_AUTH_URL=https://my.openstack.com:5000/v2.0
export OS_TENANT_ID=my-long-unique-id
export OS_TENANT_NAME="my-project"
Update your Terraform file with these values for the appropriate fields, and save the downloaded file for using the maintenance playbooks (you’ll just need to source the environment variables into your shell.)
OpenStack Security Group
In order for terraform to apply correctly, you need to create a security group in openstack for Mantl.
You can either login to the Web UI to perform this task or use the openstack commmand line interface as below.
openstack security group create <group_name>
Once your group is created, ensure you update the openstack.tf file accordingly.
OpenStack Username/Password
The playbooks get Username/Password information via environment variables:
- OS_USERNAME
Your OpenStack username
- OS_PASSWORD
Your OpenStack password
Before running terraform or any playbooks, run the following command to to pull in your username and password for Ansible to use, changing the file name and location to the location of your OpenStack RC file:
source ~/Downloads/my-project.rc
Note
The default OpenStack RC file will prompt for your password in order to set OS_PASSWORD.
Once you’re all set up there, run terraform get to prepare Terraform to provision your cluster, terraform plan to see what will be created, and terraform apply to provision the cluster. Afterwards, you can use the instructions in getting started to install Mantl on your new cluster.